
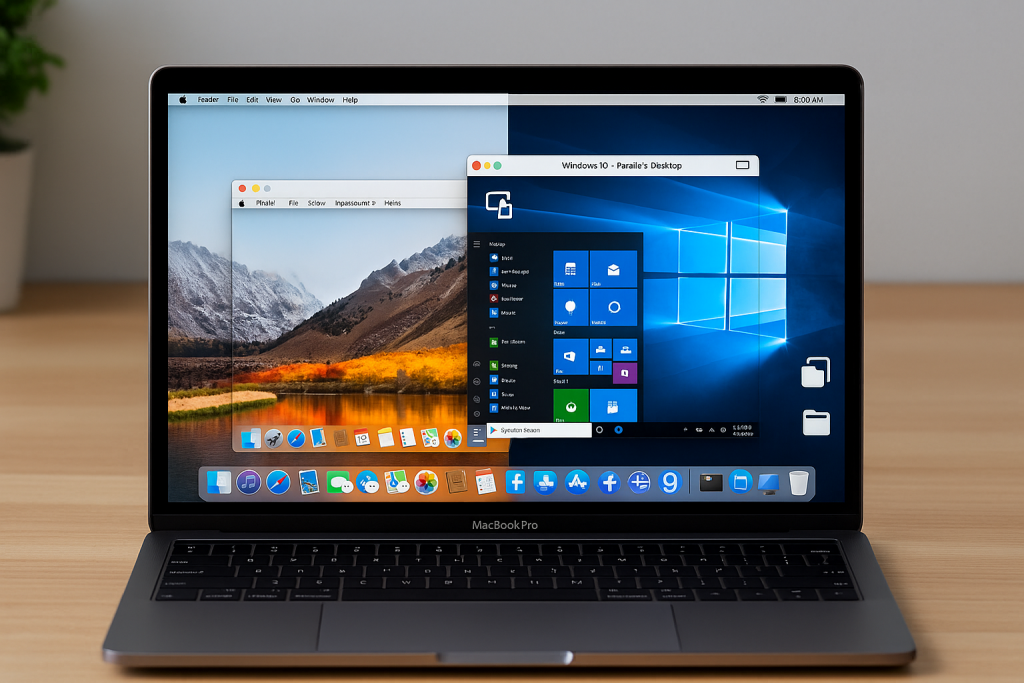
What “Running macOS and Windows 10 on the Same Computer” Really Means
If you’ve ever wished you could use macOS apps and Windows-only tools on one machine, Running macOS and Windows 10 on the Same Computer is exactly that: either you dual-boot (choose one OS at startup) or you virtualize (run Windows inside a window on macOS). The goal is simple—reach your apps faster, avoid carrying two laptops, and keep your workflow smooth.
Dual-Boot vs. Virtualization: Key Differences
- Dual-Boot (e.g., Boot Camp on Intel Macs): Runs Windows directly on your Mac hardware. You get near-native performance, great for gaming or CAD. The trade-off: you must reboot to switch OSes.
- Virtualization (Parallels Desktop, VMware Fusion, UTM): Runs Windows as a virtual machine (VM) inside macOS. Switching is instant, copy/paste works, and shared folders feel seamless. Performance is strong for office work, development, and many creative tools, but heavy 3D workloads may lag behind native.
When to Choose Each Approach
- Pick dual-boot if you need maximum GPU performance or specialized drivers.
- Pick virtualization if you prioritize convenience, quick context switching, shared clipboard, and file drag-and-drop.
System Requirements & Legal Considerations
Hardware Checklist (CPU, RAM, Storage, GPU)
- CPU: Intel Core i5/i7 or Apple Silicon (M-series).
- RAM: 16 GB is a comfortable baseline for VMs; 32 GB if you run large IDEs or heavy multitasking.
- Storage: SSD mandatory for snappy performance. Plan at least 80–120 GB free for Windows plus apps.
- GPU: For gaming or GPU-accelerated apps, prefer higher-tier Apple Silicon (M1/M2/M3 Pro/Max) or discrete AMD GPUs on older Intel Macs.
Licensing & EULA Basics for macOS and Windows 10
- Windows 10: Requires a valid license key for activation (Retail, OEM, or Volume).
- macOS: Apple’s EULA permits macOS to run on Apple hardware. Stick to official paths and avoid unsupported hacks.
For Microsoft’s official Windows 10 documentation, see the Windows lifecycle and licensing pages on Microsoft Learn.
Method 1: Dual-Boot with Boot Camp (Intel Macs)
Note: Boot Camp is supported on Intel Macs. Apple Silicon Macs don’t support Boot Camp, so use virtualization instead.
Prerequisites, Backups, and Disk Layout
- Back up your Mac (Time Machine or a full disk clone).
- Free up space. Aim for 100 GB or more for Windows.
- Update macOS and firmware, then download the latest Boot Camp Assistant support files.
Step-by-Step: Creating Install Media & Drivers
- Create a Windows 10 installer on a USB drive (or ISO approach via Boot Camp Assistant).
- Run Boot Camp Assistant → choose ISO → allocate partition size.
- Install Windows 10 and complete setup.
- Install Boot Camp Support Software in Windows to enable trackpad, audio, Bluetooth, and brightness keys.
- Run Windows Update and vendor driver updates.
Switching Between macOS and Windows Safely
- To return to macOS, Restart → hold Option (⌥) → select macOS.
- In Windows, use the Boot Camp system tray to choose your default startup disk.
Method 2: Virtualization on Intel & Apple Silicon
Parallels Desktop, VMware Fusion, and UTM Overview
- Parallels Desktop: Polished, fast, best integration (Coherence mode, seamless file sharing).
- VMware Fusion: Solid pro-grade virtualization with broad enterprise features.
- UTM (QEMU frontend): Open-source option; great for tinkerers, improving on Apple Silicon.
Creating a Windows 10 VM: CPU/RAM/Disk Settings
- Import a Windows 10 ISO (for Intel) or Windows 11 ARM for Apple Silicon (Microsoft offers ARM builds that can run x86 apps via emulation).
- Allocate 4–8 vCPUs and 8–16 GB RAM depending on workload.
- Give the VM 80–150 GB of disk space (expandable).
- Enable virtio or accelerated graphics options offered by your hypervisor.
Optimizing Graphics, Networking, and Tools (Shared Clipboard, Folders)
- Turn on integrations: shared clipboard, drag-and-drop, shared folders, and printer sharing.
- Enable 3D acceleration and install the hypervisor’s Guest Tools for smooth graphics and better input devices.
- Use bridged networking if you need the VM to appear as a full device on your LAN; NAT is simpler and safer for most users.
Performance Tuning & Resource Management
CPU, RAM, and Disk Allocation Best Practices
- Don’t starve macOS. Keep at least 8 GB free for the host.
- For compilers, containers, or IDEs, give the VM 6–8 vCPUs and 12–16 GB RAM.
- Prefer fixed-size virtual disks for predictable performance; use APFS on SSD for speed.
Battery, Thermals, and Fan Noise Tips
- Limit the VM’s background services (indexing, telemetry) to reduce heat.
- Use Energy Saver profiles in Windows and macOS.
- Keep vents clear and consider a cooling stand during long builds or gaming sessions.
Seamless File Sharing Between macOS and Windows
Shared Folders, ExFAT Drives, and Cloud Sync
- Create Shared Folders in your hypervisor that map to macOS directories (Documents/Projects).
- For external drives, ExFAT offers read/write compatibility without extra drivers.
- Cloud drives like OneDrive, iCloud Drive, and Dropbox keep files in sync across OSes.
Keyboard Layouts, Shortcuts, and Input Method Tips
- Map Option ↔ Alt and Command ↔ Windows keys to match muscle memory.
- Set consistent language/IME preferences to avoid surprise layout switches.
- Learn a few essentials: Cmd+C/V in macOS vs Ctrl+C/V in Windows; many hypervisors translate these for you.
Security, Backups, and Recovery
Snapshots, Time Machine, and Windows Backups
- Take VM snapshots before big installs or registry edits—instant rollback is a lifesaver.
- Keep Time Machine running for macOS and use File History or System Image for Windows.
- Store product keys and recovery ISOs safely.
Antivirus, Gatekeeper, and Patch Hygiene
- Keep Windows Defender (or your chosen AV) updated.
- Update macOS apps via the App Store and let Gatekeeper block unknown binaries.
- Patch both OSes regularly to close vulnerabilities.
Common Issues & Fixes
- Windows activation fails: Verify license type; re-enter product key after hardware/VM changes.
- Trackpad gestures missing (dual-boot): Reinstall Boot Camp Support Software.
- Blurry fonts or scaling: Tweak Display Scaling in Windows and Retina scaling in the hypervisor.
- Audio crackle or lag: Update guest tools/drivers; switch the VM’s audio device model.
- USB device not detected: Attach the device explicitly to the VM and install drivers.
- Network sharing unreliable: Prefer NAT for simplicity; reset the VM’s virtual NIC.
FAQs
1) Can Apple Silicon Macs install Windows 10 natively?
No. Apple Silicon Macs don’t support Boot Camp. Use virtualization and Windows ARM builds, which can run many x86 apps via emulation.
2) Is Running macOS and Windows 10 on the Same Computer safe for my data?
Yes—if you back up first, allocate resources carefully, and keep both systems patched.
3) How much storage do I need?
Budget 100–150 GB free for Windows plus apps and updates. Heavy games or datasets may need more.
4) Will my games run well in a VM?
Light and older titles often run fine. For AAA performance, dual-boot on Intel Macs is better; on Apple Silicon, VM 3D performance is improving but still varies.
5) Do I need antivirus in both systems?
Yes. Use Windows Defender (or equivalent) in Windows, keep macOS Gatekeeper on, and patch regularly.
6) What’s the easiest path for most users?
Virtualization with Parallels or VMware Fusion—fast to set up, great integration, zero rebooting.
탑플레이어포커머니상